Editing Objects
Selecting Single Objects
A single graphic object can be selected by left-clicking on one of its points.
Image of a selected line.

The selected line has it's points highlighted.
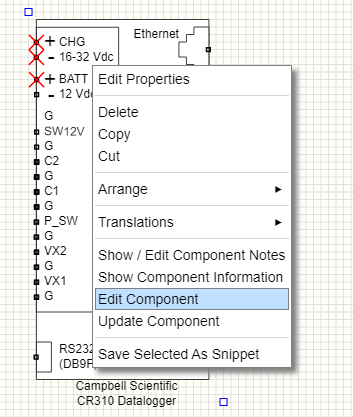
A component can be selected by hovering over it and left-clicking.
To edit a component that is in the Schematic Editor right-click on it and select Edit Component. This will open the component in the Component Library Editor.
Selecting Multiple Objects
CTRL + Left-click
Left clicking a graphic object point will select it and deselect all others.
Holding the CTRL key down while clicking will toggle the selection allowing you to select / deselect multiple objects individually.
Dragging Mouse
Holding the left mouse button down and dragging across the screen will display the multi-select rectangle.
Releasing the left button will select all objects within the multi-select region.
From there, you can select more or toggle selected objects to deselect them by holding the CTRL keyboard button down.
Right-clicking any of the selected objects will open the Properties Dialog where you can edit graphic attributes for the selected objects.
If there are different types of objects selected, only the common properties will be enabled in the Properties Dialog.
For example, a circle and line both selected will allow you to change the line color and width but not fill or circumference etc.
Image showing multi-select region being dragged out.

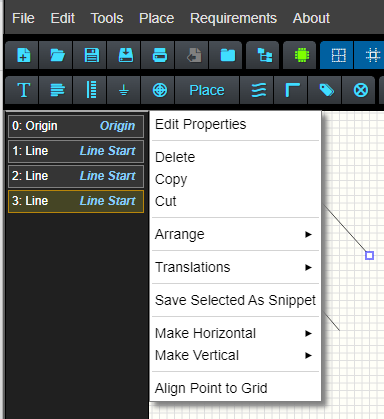
Object Stack
The Object Stack is toggled using the  toolbar button.
Hovering over an Object Stack element will highlight it in the drawing screen of all three editors (Component Library Editor, Schematic Editor and Layout Editor).

Object 4 is being hovered over and is highlighted in the schematic.
Clicking on an Object Stack element will toggle its selection.

Right-clicking on an Object Stack element will show the edit context menu.
Undo / Redo
Editing operations can be undone using either CTRL+Z for Undo and CTRL+Y for Redo or by using the toolbar menu buttons
 for Undo and
  for Redo
Context Menus
Context menu options will vary depending on the type of objects the menu is for.
General Graphic Object Context Menu

Change colors, opacity, line thickness, font-size etc using the Properties Dialog.
Delete selected objects
Copy selected objects
Cut selected objects
Arrange selected objects position in the object stack
Flip, rotate and move selected objects.
Edit the size of rectangle objects.
Save selected objects to Snippetes.
Options to make the object horizontal.
Options to make the object vertical.
Snap the hovered on point to the closest grid point.
Arrange Context Sub-menu

Bring an object to the front ('top') of the object stack
Bring an object forward in the stack
Send an object backward in the stack
Send an object to the back ('bottom') of the stack
Translations Context Sub-menu

Flip selected objects horizontally
Flip selected objects vertically
Rotate selected objects left by 90°
Rotate selected objects right by 90°
Rotate selected objects 180°
Move selected objects.
While the objects are being dragged after selecting the Move menu option, SPACE BAR keyboard key will rotate them left 90° and G button will toggle whether the objects are grouped or not.
If the objects are grouped then the following text will be displayed beside the mouse cursor:

Make Horizontal Context Sub-menu

Adjust the other point with a description of where the point is.
Adjust the point currently being hovered on to be horizontal.
For polylines, polylines, wires and cables, other adjustment points may be enabled in the context menu.
Make Vertical Context Sub-menu

This menu allows you to:
Adjust the other point with a description of where the point is.
Adjust the point currently being hovered on to be vertical.
For polylines, polylines, wires and cables, other adjustment points may be enabled in the context menu.
Edit Size Context Sub-menu

The Edit Size menu allows you to edit the width and height of a rectangle.
Polyline, Polygon, Wires, Cable and Bus Options

Extra options are available for these objects:
Insert node before the point currently being hovered on.
Insert node after the point currently being hovered on.
If you are hovering on the start node (point) a new point will be inserted before the start point.
If you are hovering on the end node (point) a new point will be inserted after the end point.
Deletes the point currently being hovered on.
If only two points exist, the point will not be deleted.
For Polylines and Polygons the option Toggle Polygon / Polyline is available.
This will turn a polyline into a polygon and visa vera.
Group Context Sub-menu

When more than one object is selected, the Group context menu options become available.
You can group objects using this menu, or if the objects are already grouped, you can Ungroup them or Add to this group which will allow you to click on other objects to add them to this current group.
The option to Remove from group is made available if only one object from the group is selected.
After clicking Add to this group the text * Add to Group * will appear next to the mouse cursor.

Clicking on object points will add that object to the current group.

When objects are grouped, hovering over one of them in the Object Stack will shade other objects that belong to the same group.
In this example, object 4 is being hovered on which highlights objects 2 and 3 because they belong to the same group.
When a grouped object point is hovered on, all other objects that belong to the same group also have their points highlighted.
In this example, objects 2 and 3 have their points highlighted because object 4 is being hovered on.